
|
|
|
Secateurs, Bypass Loppers, & Pole Pruners |

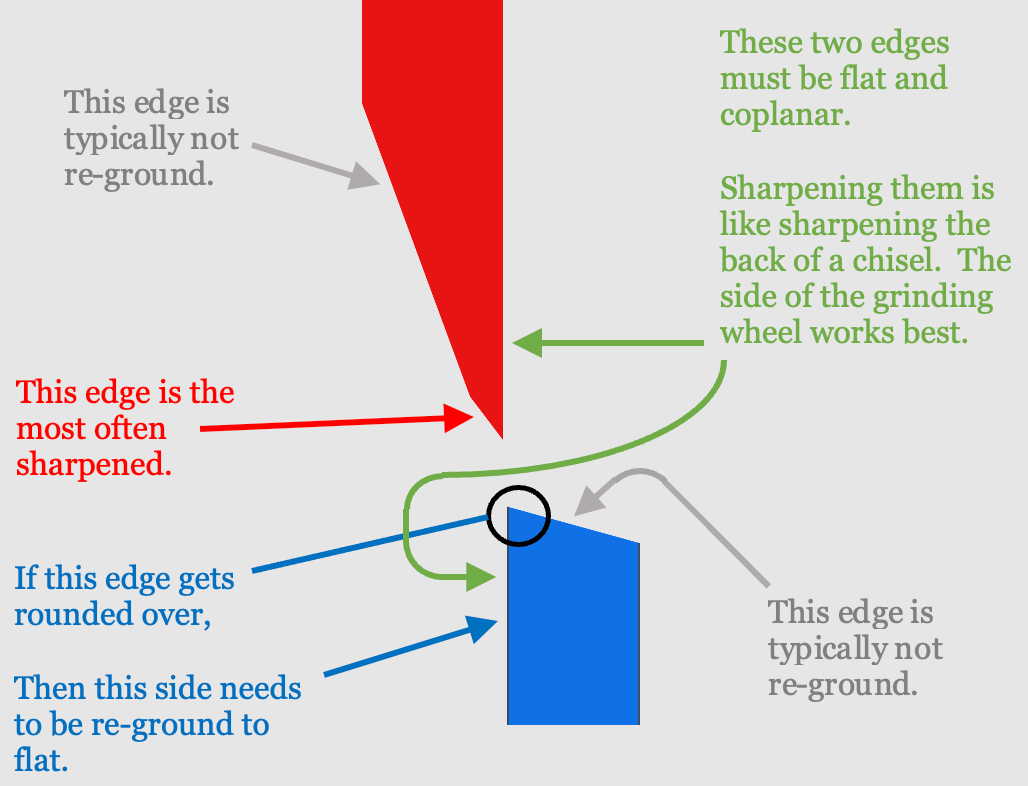
Cutting Blades Coloured

|

|
Angles of Cutting Blades
Secateurs are also known as Bypass Pruners, Hand Pruners, and Pruning Shears. Bypass Loppers are sharpened using the same guidance as Secateurs. Additional information for sharpening Pole Pruners is in the comments section.
Angles are shown in the end views of the upper blade (red) and lower blade (blue).
|
The best tool in the garden is the knowledge of the gardener. Unknown |
A 6" smooth cut machinist’s hand file is useful to carry in your gardening tools box. Touching up the upper blade (red) may be needed to ensure you have clean cuts, reducing the work on your hands and reducing the risk of damage to the plant.
Felco manufactures secateurs for many vendors. Consider following the guidelines noted below for Felco Hand Pruners.
Sharpening Notes for the Secateurs' Edges
New secateurs and bypass lopers I have purchased have not needed to be reshaped. However, they may need work if a nick is incurred in the blade.
A 12-14" bastard machinist’s hand file is often sufficient for reshaping the tool's cutting edge.
If you choose to use an angle grinder, consider using a 120 grit flap disc. A metal grinding wheel may be needed for large-scale shaping. In either case, be sure to not overheat the metal too much: it weakens the metal.
For secateurs, I find that the Tormek works quite well, especially if the blade can be detached from the tool.
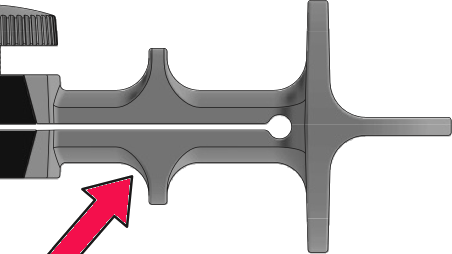
KJ-45 bottom stop
When using the KJ-45, use the bottom stop (this is shown in the picture to the right, and is indicated using a red arrow). Using the bottom stop is necessary to achieve the sharpening angle for β2.

|

|
|||||||||||||||||||||||||||||||||||||||||||||||||||||||||||||||||||||||||||||||||||||||||||||||||||||||||||||||||||||||||||||||||||||||||||||||||||||||||||||||||||||||||||||||||||||||||||||||||||||||||||||||||||||||||||||||||||||||||||||||||||||||||||||||||||||||||||||||||||||||||||||||||||||||||||||||||||||||||||||||||||||||||||||||||||||||||||||||||||||||||||||||||||||||||||||||||||||||||||||||||||||||||||||||||||||||||||||||||||||||||||||||||||||||||||||||||||||||||||||||||||||||||||||||||||||||||||||||||||||||||||||||||||||||||||||||||||||||||||||||||||||||||||||||||||||||||||||||||||||||||||||||||||||||||||||||||||||||||||||||||||||||||||||||||||||||||||||||||||||||||||||||||||||||||||||||||||||||||||||||||||||||||||||||||||||||||||||||||||||||||||||||||||||||||||||||||||||||||||||||||||||||||||||||||||||||||||||||||||||||||||||||||||||||||||||||||||||||||||||||||||||||||||||||||||||||||||||||||||||||||||||||||||||||||||||||||||||||||||||||||||||||||||||||||||||||||||||||||||||
| One style of Pivot Jig with the Tormek SVM-45 | ||||||||||||||||||||||||||||||||||||||||||||||||||||||||||||||||||||||||||||||||||||||||||||||||||||||||||||||||||||||||||||||||||||||||||||||||||||||||||||||||||||||||||||||||||||||||||||||||||||||||||||||||||||||||||||||||||||||||||||||||||||||||||||||||||||||||||||||||||||||||||||||||||||||||||||||||||||||||||||||||||||||||||||||||||||||||||||||||||||||||||||||||||||||||||||||||||||||||||||||||||||||||||||||||||||||||||||||||||||||||||||||||||||||||||||||||||||||||||||||||||||||||||||||||||||||||||||||||||||||||||||||||||||||||||||||||||||||||||||||||||||||||||||||||||||||||||||||||||||||||||||||||||||||||||||||||||||||||||||||||||||||||||||||||||||||||||||||||||||||||||||||||||||||||||||||||||||||||||||||||||||||||||||||||||||||||||||||||||||||||||||||||||||||||||||||||||||||||||||||||||||||||||||||||||||||||||||||||||||||||||||||||||||||||||||||||||||||||||||||||||||||||||||||||||||||||||||||||||||||||||||||||||||||||||||||||||||||||||||||||||||||||||||||||||||||||||||||||||||||
When using the SVM-45, adding a pivot jig (especially the pin pivot jig) works exceptionally well.
You can also use machinist’s hand files. Start with an 8-10" medium (or second) cut file, and finish with a 6" smooth cut file, then use this file to remove the burr.
The tools needed to remove the blade for sharpening it are:
The video below, Cleaning & Sharpening Felco Secateurs For The Gardening Season Ahead, may be useful for the disassembly & re-assembly of the secateurs.
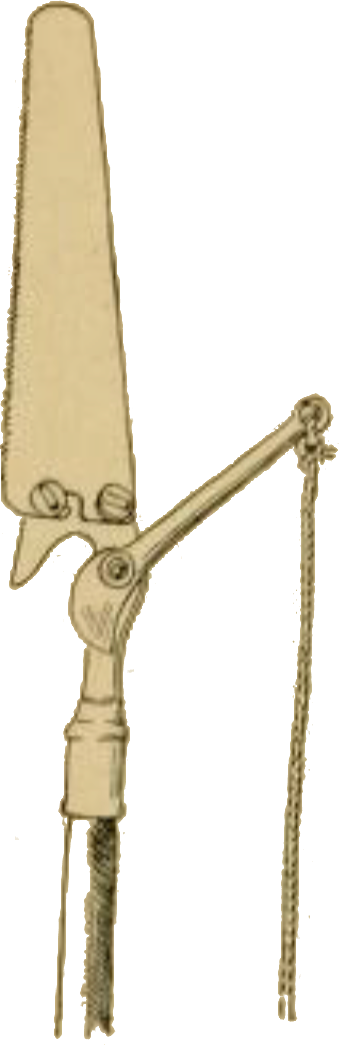
Pole Pruner with Saw Blade

Pole Pruner Cutting Blades
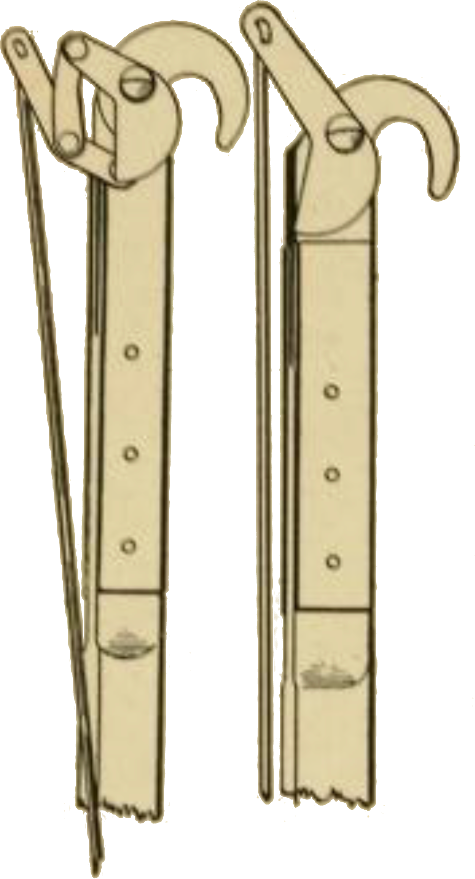
Double Lever & Single Lever Pole Pruner
Pole pruners also need to be sharpened to work as expected. The two traditional types are shown in the picture at the bottom left.
The two blades are noted in red & blue in the picture to the left, and are sharpened as noted above. Also, as noted above, the sharpener must ensure the blades remain coplanar.
The video noted below, Pole Pruner Maintenance, is a good reference for the other maintenance activities needed to ensure long life of this tool.
If the pole pruner has not been maintained before (much less sharpened), you should plan to replace all the attachment screws.
Also, if the parts have been bent (i.e., when using the tool when the blade was dull), you will need to straighten everything out before re-assembly. A bench vise and a dead-blow mallet are useful for this.

Safety Note: Inspect any bent parts to ensure that the part has not received stresses which would weaken the tool and make it dangerous to use. Replacing the tool will be less costly than a doctor’s visit.
If the pole has a saw blade attached as shown in the picture to the right, the saw blade is sharpened following the instructions for Hand Saws.
It is best to remove the saw blade for sharpening; otherwise, the long arm of the pruner will make the process cumbersome.
| αPrimary Bevel | 30° | |
| αMicro Bevel | +5° |
There was a version of the pole pruner where a chisel blade is attached to the end in lieu of a saw blade. If you are sharpening the chisel blade, the recommended angles are noted in the table below.
The use of a microbevel allows for fast resharpening / touch-up in the field.
This makes for a rather obtuse angle on the chisel’s edge; however this tool will often be used fairly aggressively, and with varying densities of wood.
There may be embedded materials in the wood (e.g., staples, nails, and even fence wire) which will quickly dull the edge. Keeping a machinist’s hand file handy is recommended.
More information about chisels is available at the chisels page.

Example icon
Sharpness scales (as shown in the grey icon to the left) are used to indicate the recommended sharpness for the blades noted above. You can click on any of the icons showing the sharpness scale and be redirected to the page describing this more. Lower numbers are duller; higher numbers sharper.
These are general recommendations; you will need to use your own judgment, based on the knive’s intended purpose.
The presenter in the video uses the Felco screwdriver tool for removing the screws. I prefer to use a 12mm open-end wrench and an 8mm open-end wrench.
If you take care of this tool, you will produce more with less effort. These few tips can go a long way to help your company be effective and professional. A short video that explains just how to take care of this valuable tool. A pole pruner is great but a dull or poorly working tool is a pain in the @%% !
More pictures are also shown on the Jigs, Fixtures, & Modifications page.


