Notes & Comments
The shape of the grind used is a call best made by the tool's use, based on your own experience. Additional notes are available for Grind Profiles.
I've not found value in adding micro/secondary bevels to pocket knives which get used, so that is not recommended here. If the sharpener wants to add one, an additional 2° should be sufficient. (More notes are also available on a different web page for Micro / Secondary Bevels.)
The Knife Angle Setter jig is greatly useful if using the WM-45 Knife Jig to hold the blade.
Good Guidelines Regarding Edge Angles
This information was posted on the Tormek forum and has been copied here as it is a good reference.
|
β
|
Comments
|
|
<10°
|
Edges in this range are good for cutting softer materials.
For example, razor blades are sharpened at angles of five to nine degrees. This does result in a delicate edge which is easy to damage.
|
|
10° - 15°
|
Knife edges in this range of angles can be applicable in providing a smooth cutting action for knives which are used to slice meat or cut other soft items.
This is why fine Japanese knives are usually sharpened is in this range. It is also common for some woodcrafts knifes and fillet knives.
Do note: many Japanese and carving knives are only sharpened on one side. I that case, α.
Also note that a knife which is sharpened at such an angle has an edge angle which is too weak to handle any chopping motion type of work. And, if the steel is harder (such as with Japanese knives), such a sharp angle will easily fracture if used in chopping activities.
|
|
15° - 17°
|
With an α angle of 30° to 34°, these knives will cut quite easily.
Japanese knives and newer Chef's Knives are usually sharpened at this angle from the factory. Although less durable than those with higher angles, their cutting power makes it an appropriate tradeoff.
|
|
17° - 22°
|
Knives in this angle are common in kitchens and outdoor activities. It is also a useful edge angle range for pocket knives.
This is a common sharpening angle when you are looking for a general-use blade, and is the typical sharpening angle for most standard kitchen knives. These knives are often built of tough material that can withstand a sharpening edge of this angle and still cut well without any issue.
|
|
22° - 30°
|
Edges in this range are more durable, and are appropriate for forrest and hunting knives, pocket knives, and tougher applications. This is a typical edge angle for durable knives.
|
|
>30°
|
Edges past 30° are very durable, although their cutting ability is significantly reduced. Most knives won't benefit from this sharpening angle.
These angles are common in tools and cutting blade such as cleavers, machetes, and axes, especially as these tools are made from softer steel.
|
More Information
Books & Papers
Videos & Presentations
- Tom Bartlett (Sharpening Supplies)
- How To Sharpen A Scandi Grind (YouTube video) - This video Tom discusses less about how to sharpen a scandi grind than a lot of tips on sharping this grind profile.
- Steve Bottorff
- Jeff Farris
- Dr. Vadim Kraichuk (Knife Grinders)
- Herman Trivilino
|
|
Published Articles
- Research Articles, Other Information, and some Final Thoughts. Some key ones for this topic are below.
- If you want to get truly sharp, Dr. Vadim Kraichuk with KnifeGrinders has a really good method and has adapted the Tormek system to these wheels. The KnifeGrinder method is one that is proven, and has great tools to assist with making it easy.
- Dr. Vadim Kraichuk posted a great analysis titled, "Edge Stability in Butcher’s and Kitchen Knives as a Function of Edge Angle and Initial Sharpness" on the BESS EXchange.

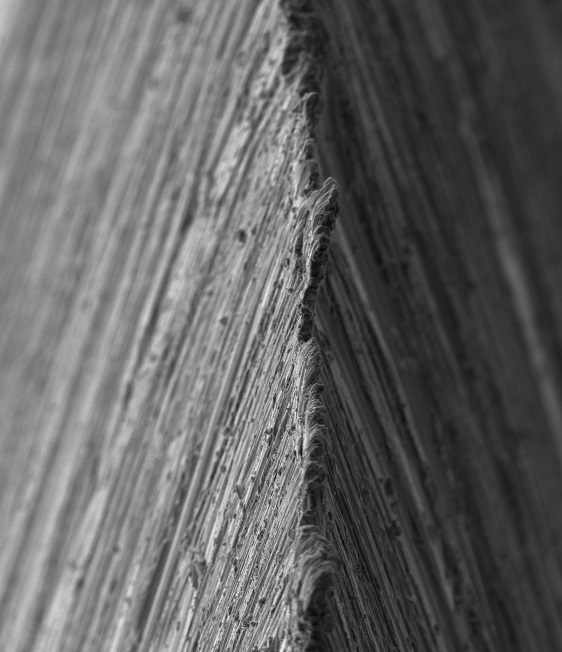
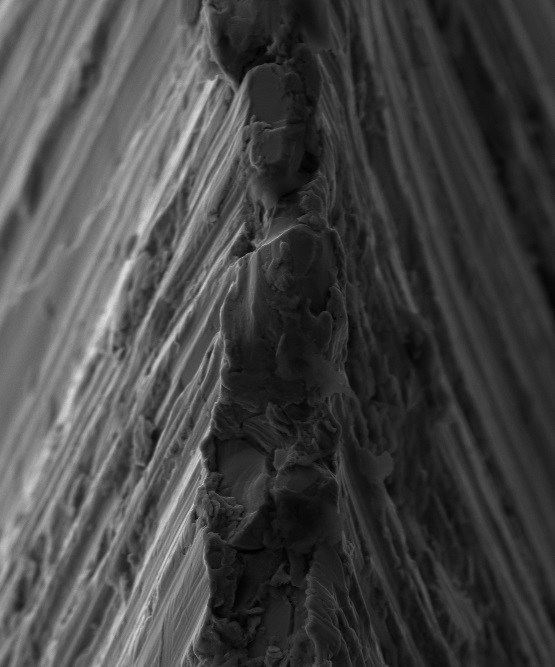
 Click on either image for bigger size.
Images courtesy Todd Simpson
via Dr. Vadim Kraichuk of KnifeGrinders
- Polished or "toothy" bevel? An article by Larrin, "How Chipping of Edges Happens at a Microscopic Level" (on Knife Steel Nerds), debunks the idea of coarse edges due to the increased propensity for chipping and faster dulling of the blade. As noted by Dr. Vadim Kraichuk, "Meat plants are well aware that knives with coarse edges worsen product presentation and increase operators' fatigue and repetitive strain injuries. On the contrary, polished edges improve product quality through higher value cuts and increase throughput.".
- It is a common, but quite bad, practice of drawing the newly sharpened knife edge through a piece of wood or some other media to "rip off" the remnants of the burr. When this is done, the ripped off metal builds up on the front of the slice, and you then drag the rest of the edge through this crud. This crud, together with breaking off of ledges of material along the edge, will roughen the edge and worsen sharpness.
The scanning electron microscope (SEM) images to the right show the burr on a knife in the 1st image, that was then "ripped off" by cutting cross-grain into a piece of redwood in the 2nd image - loss of the sharp edge is obvious.
Key take-away from these photos : don't skip the honing step.
Web Sites
- Jigs, Fixtures, & Modifications. One of the key ones for this topic is below.
- Jan Švancara posted a design for using a knife sharpening platform in 2015 on the Tormek Forum. This is certainly worth reading, and there are also pictures of this in the jigs section.
|


